Creating our first LXC VPS with Proxmox VE 6.2 at SoYouStart
Creating our first LXC VPS with Proxmox VE 6.2 at SoYouStart
Contributed by @Not_Oles -- July 14, 2020
Introduction
Our goal is to become a Low End hosting provider by selling virtual private servers (VPSes) created with Proxmox Virtual Environment ("PVE") on an inexpensive bare metal host server rented from SoYouStart.
In the first post in this series we successfully installed PVE Version 6.2 on a Low End SoYouStart server.
The second post in this series discussed postinstall configuration of Proxmox.
In this post, using the SoYouStart Control Panel, we will obtain for our server a second IP address. Then, using the Proxmox web Graphical User Interface (GUI), we will create our first LXC VPS and configure its network with the newly obtained IP address.
Contents
- Add an IP to our SoYouStart Server
- Download an Operating System Template
- Launch the Create LXC Container Dialog
- Container ID, Hostname, Password
- Operating System Template
- Root disk
- CPU
- Memory
- Network and Firewall
- DNS
- Confirm and Start
- Test
- Update and Dist-upgrade
- Firewall
- Conclusion
Add an IP to our SoYouStart Server
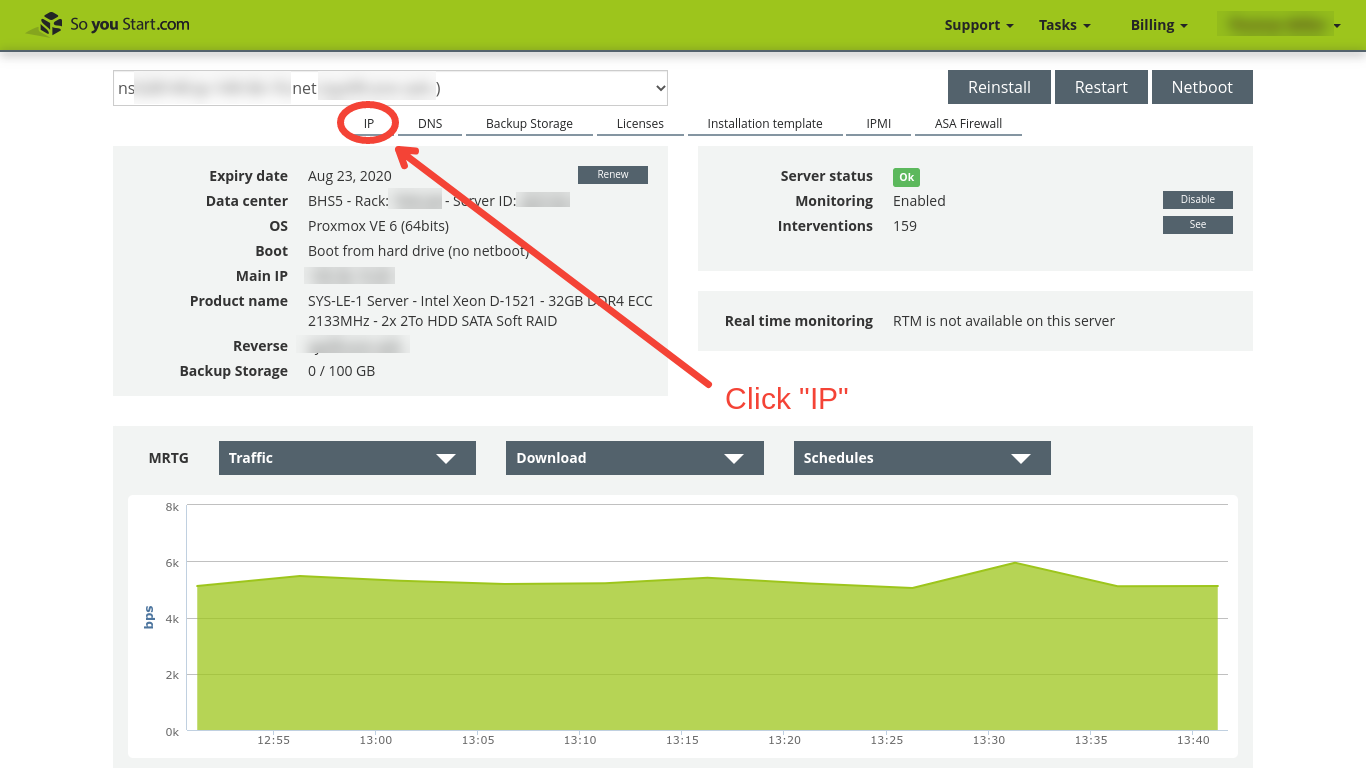
Log in to the SoYouStart Control Panel and select IP.
On the Manage IPs panel, we can click either (1) on "Order IPs," or, (2) if, as here, we already have extra IP addresses assigned to the server, on the "+" symbol to expand the list of IP addresses.
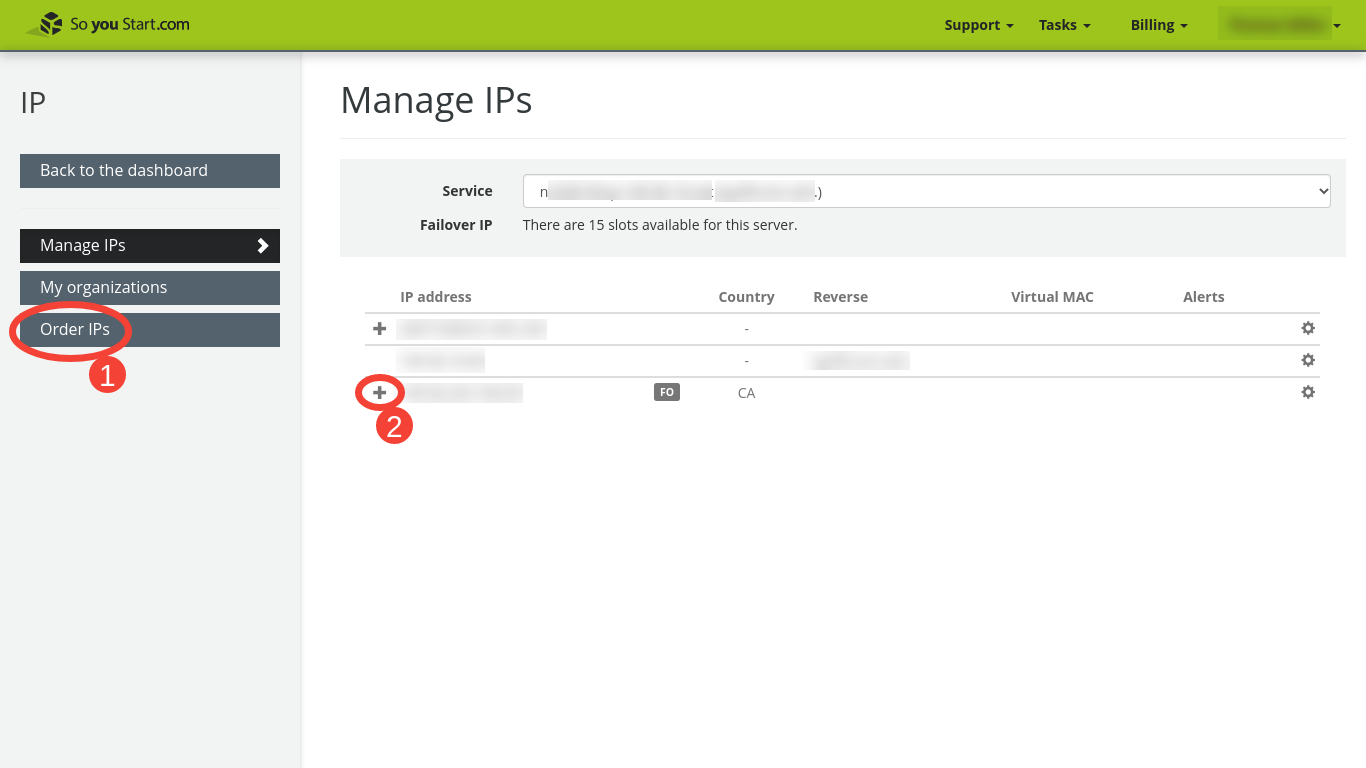
When the list of IP addresses and their corresponding virtual MAC addresses is exposed, we can take note of one pair which is not already in use. To assign them to the VPS we will be creating, we will enter this set (consisting of one IP address and its corresponding virtual MAC address) into the Proxmox Control Panel. In addition to our VPS' IP and its corresponding MAC address, we will need the IP address of our host server.

Download an Operating System Template
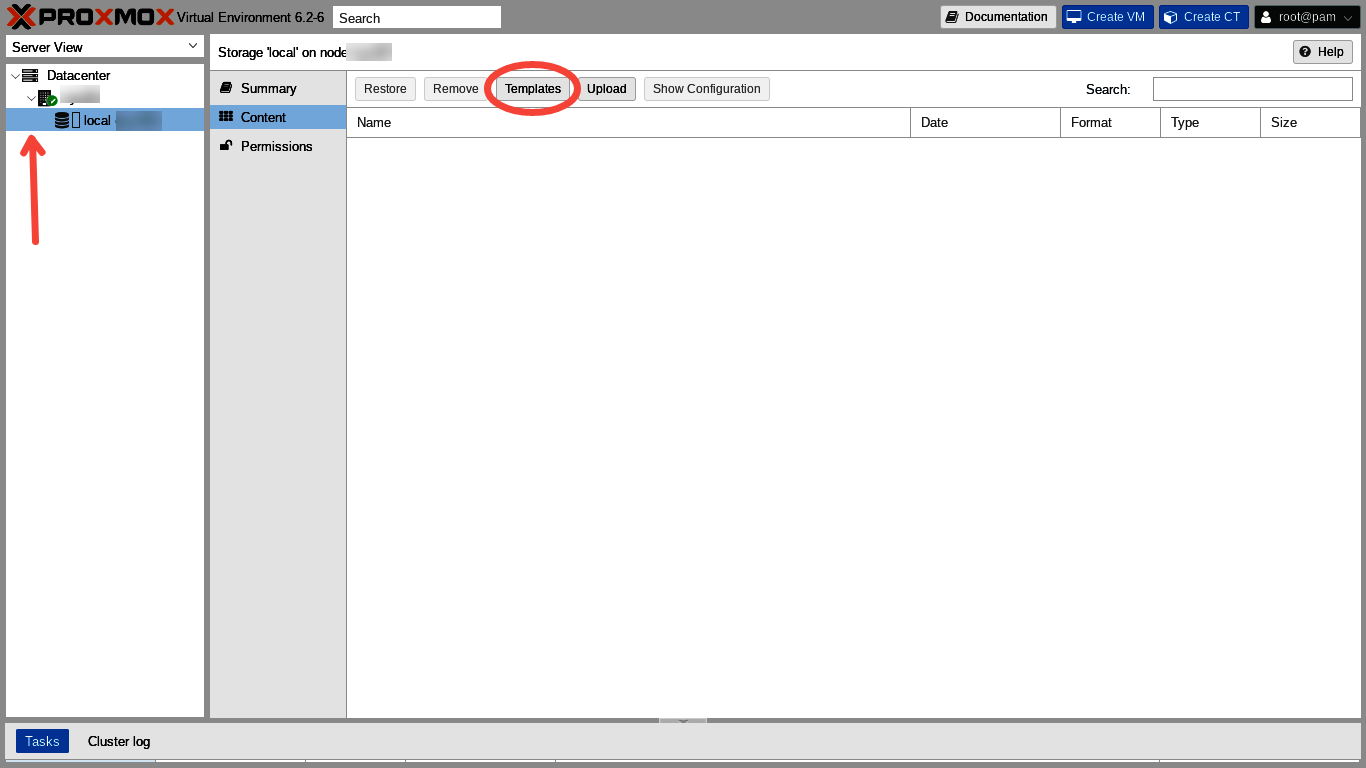
In the far left hand Server View column of the Proxmox web GUI, we make sure that Datacenter and Node are expanded by clicking on the tiny ">" so that it points down. We need to expose the "local" storage line entry and click on it. Then we head to the top menu of the main panel and click "Templates."
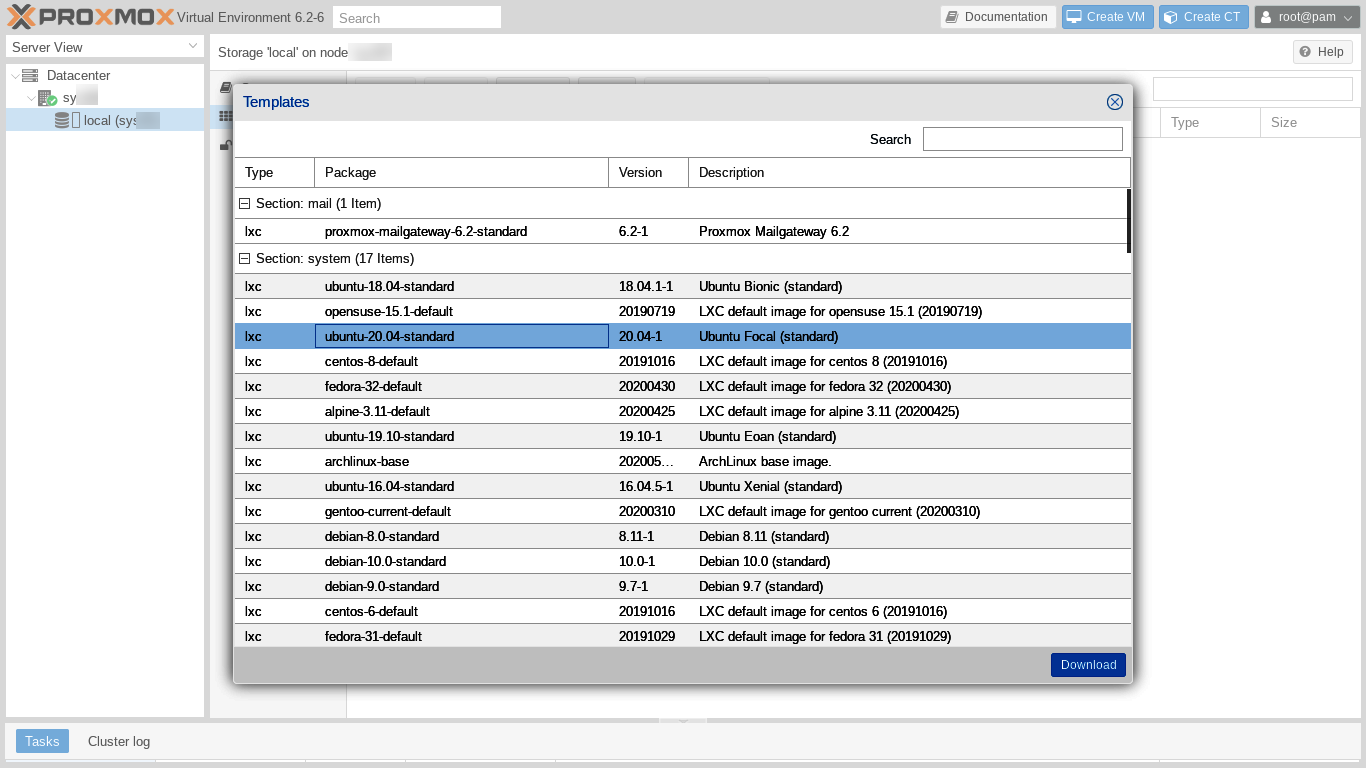
The "Templates" dialog opens. We can see and select from quite a long list of possible GNU/Linux distributions and releases. In addition to the "usual" candidates, we can choose from many Turnkey Linux templates, which include GNU/Linux plus preinstalled software packages, such as Wordpress. Let's click on Ubuntu 20.04 and then "Download" in the lower right hand corner of the dialog.
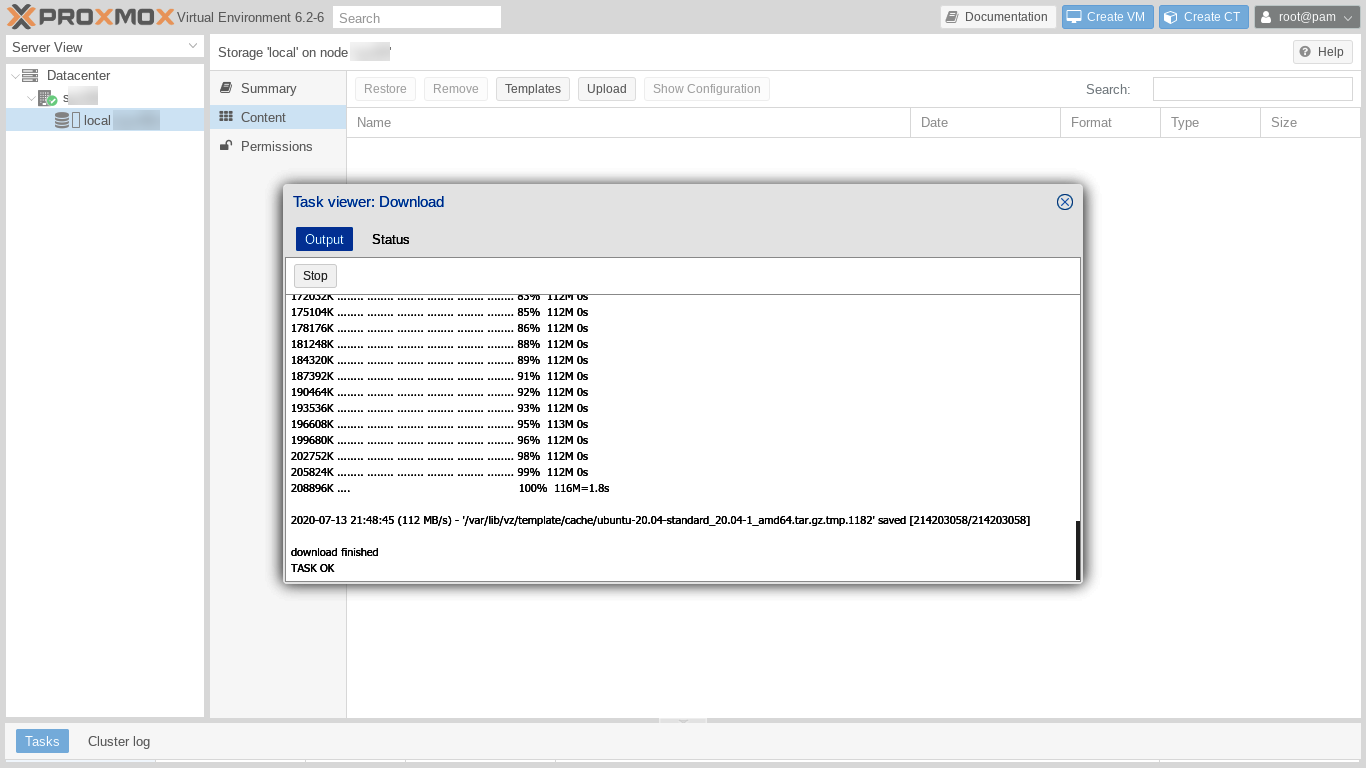
The Templates dialog is replaced by a "Task viewer: Download" window which shows the progress of the template download. We may have to scroll down to see the final "TASK OK" line.
Launch the Create LXC Container Dialog
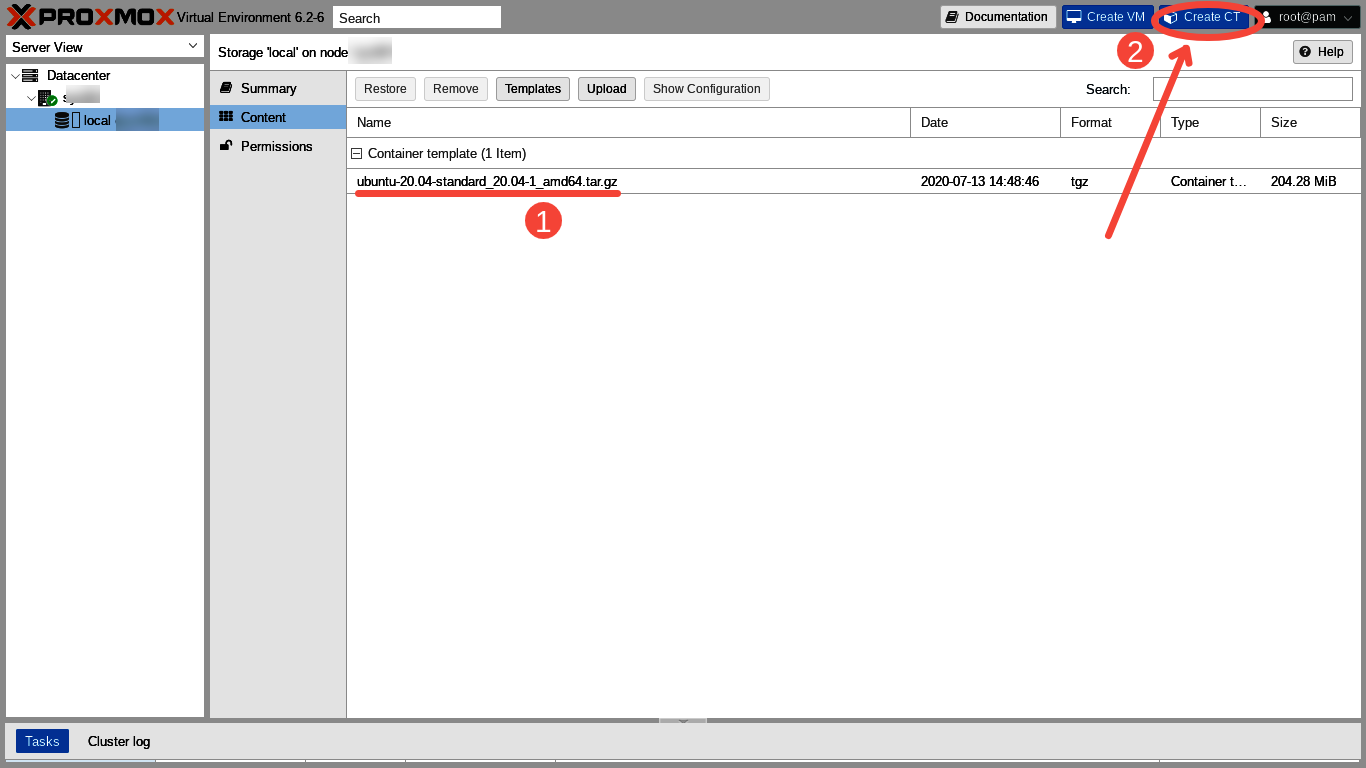
After closing the Task viewer window we are able to see (1) our newly downloaded Ubuntu 20.04 template. Let's now click on (2) the "Create CT" button to launch the "Create LXC Container" dialog. Within the Create LXC Container dialog we will configure our first container during the next few steps.
Container ID, Hostname, Password
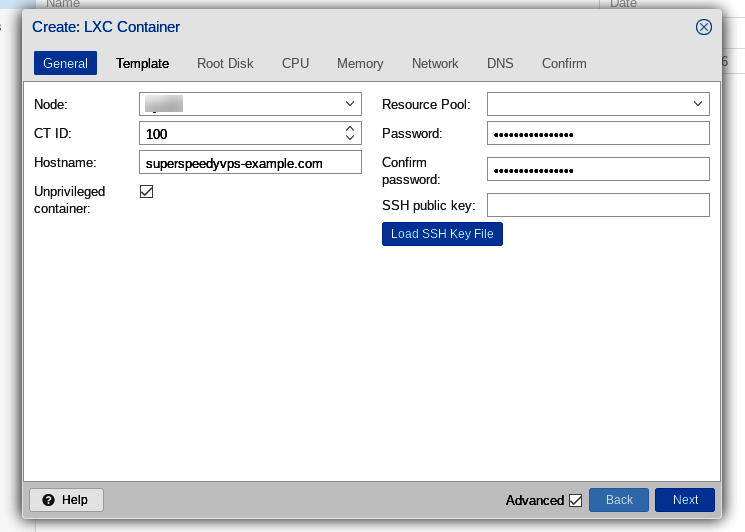
We begin in the "General" tab of the Create LXC Container dialog. A numerical Container ID is entered automatically with the container IDs beginning at 100. We enter the fully qualified hostname of our VPS, "superspeedyvps-example.com." Then we enter a password and confirm the password.
Note that the "Unprivileged container" type which we need is checked by default. Giving out privileged containers might create a significant security risk.
Now, we click "Next" to move on to the "Operating System Template" tab.
Operating System Template
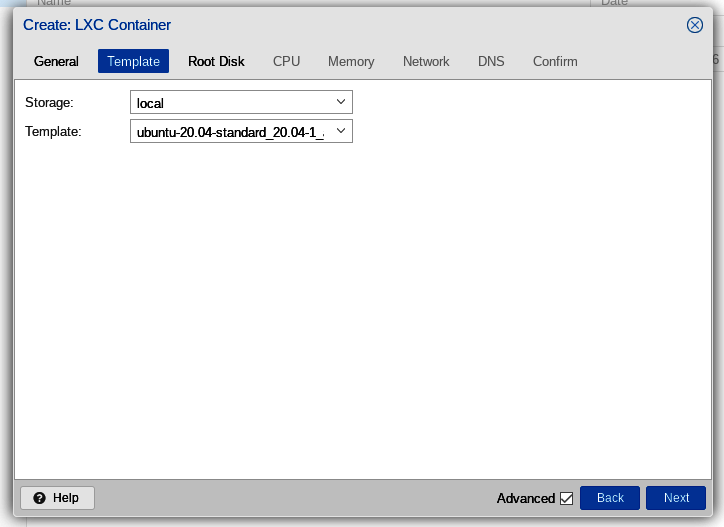
In the operating system "Template" tab, we select the Ubuntu 20.04 template which we recently downloaded, then click "Next."
Root disk
Next is the "Root Disk" tab. Here we can just go with the defaults, since our server has the default "local" storage configured and since we are satisfied with the default 8 GiB size for the root disk of our first VPS.

CPU
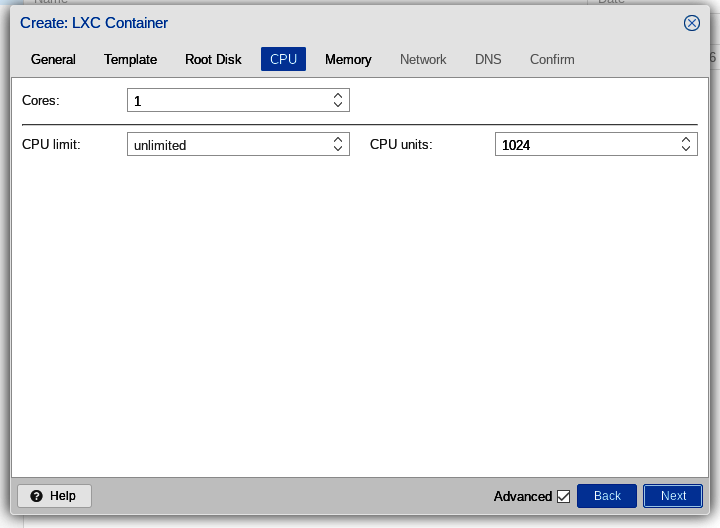
The next tab is the "CPU" tab. Here we again go with the default of one core and no limit.
Memory
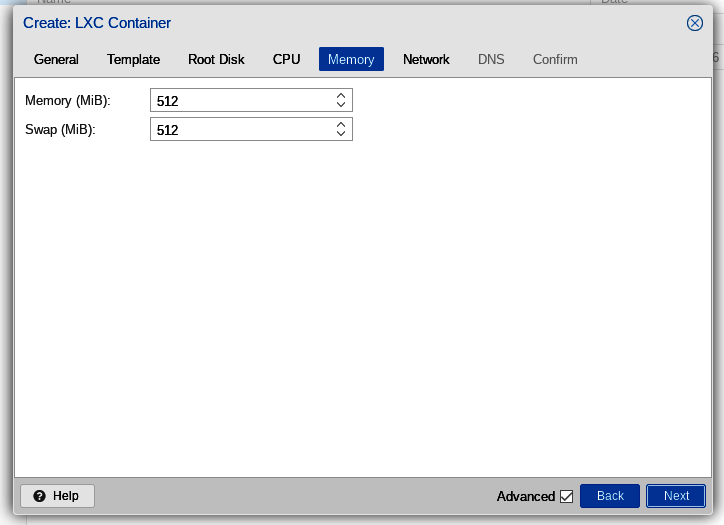
Since we are Low End, we are making a very small VPS! So let's continue with the default size of 512 MiB for both main memory and swap.
Network and Firewall
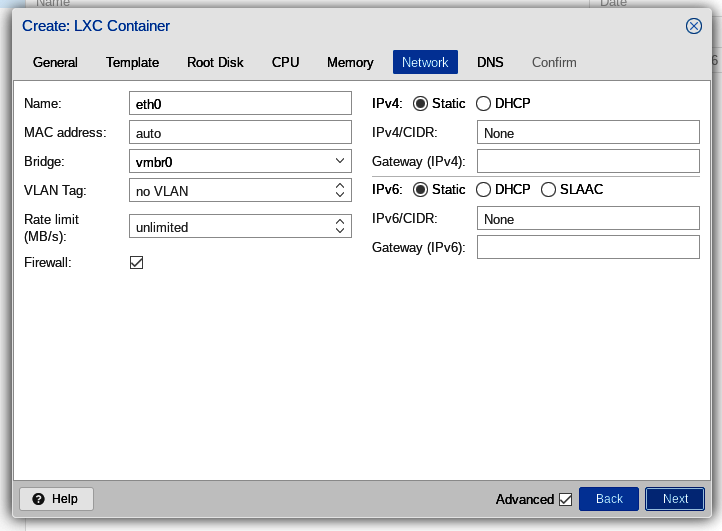
The next tab, "Network" can be a bit tricky with OVH failover IPs. Let's first take a look at the defaults and then discuss the changes we need to make. First, here are the defaults:
OVH extra IPs have the elegant advantage that the customer quickly and easily can move the IP from one server to another. OVH uses the term "failover" to refer to extra IPs, because, if the server or VPS assigned to an IP ever fails to work for any reason, the customer quickly and easily can move the extra IP over to another server. This works because the OVH failover IPs are "announced" but not "routed."
To work with the failover IPs, the customer needs to use OSI model Layer 2 networking instead of Layer 3 networking. Using Layer 2 networking can be challenging for those new to it.
Notably, OVH's "gateway" IP addresses frequently are "out of band" with respect to failover IPs. Also, some widely adopted networking autoconfiguration tools sometimes do not play nicely with out of band gateways and Layer 2.
Fortunately for us, however, Proxmox understands OVH's failover IP networking very well! All we need to do is to enter the MAC address, its paired IP address, and the gateway address, all of which we noted back at the beginning in the SoYouStart Control panel. Let's go!
First, we click in the MAC address box, which contains the default, "auto." We replace "auto" with the MAC address we obtained from the OVH Control Panel. The MAC address should be a series of numbers, letters, and colons, looking something like "a1:b2:c3:d4:e5:f6". Let's not enter the quotation marks and let's not enter the final period.
Next, we enter our VPS's IP address in the "IPv4/CIDR" box at the top of the right hand column. Since the IP address needs to be entered in CIDR format we append "/32" to the IP address. So we'll be entering exactly the address the SoYouStart Control Panel gave us for the extra IP to be added, but with "/32" appended. Our entry should look something like "xxx.xxx.xxx.xxx/32", without the quotation marks.
Finally, we enter the gateway for our VPS, which is exactly the same as the primary network address of our host server (not the address of our VPS) but with the last three digits replaced by 254. So, if our host server is xxx.xxx.xxx.xxx, then the gateway for our VPS is xxx.xxx.xxx.254.
DNS
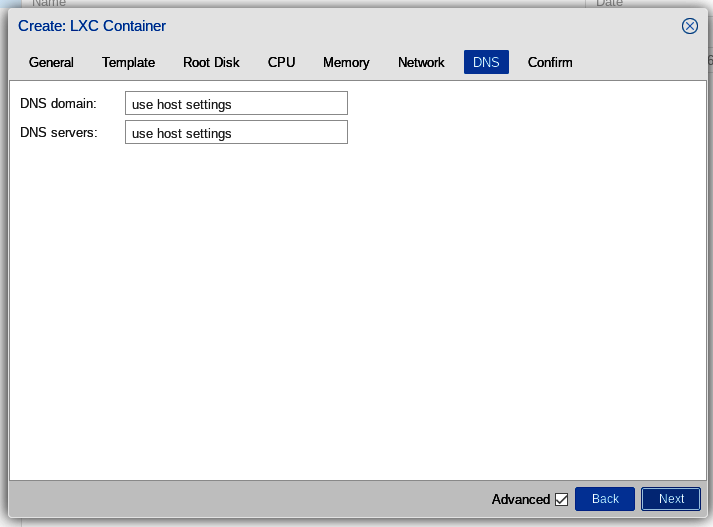
The "DNS" tab is easy because our VPS can use the settings configured for the host server. Thus, for DNS, we just accept the defaults.
Confirm and Start
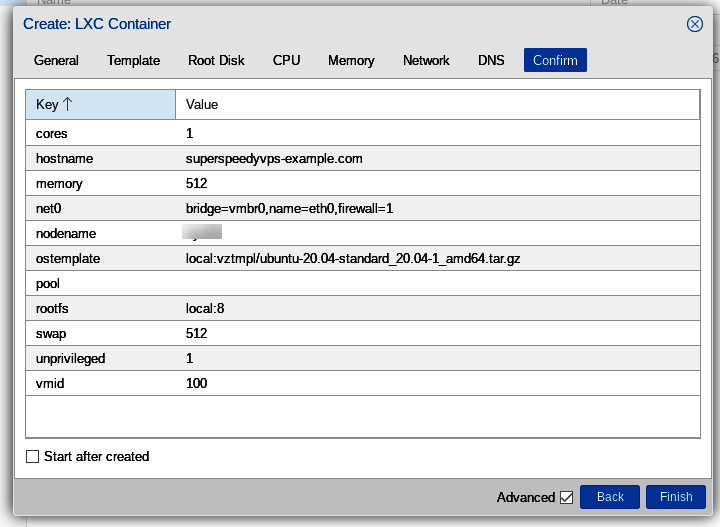
Now we arrive at the "Confirm" tab. We have the opportunity to review most of our previous entries. Also, if we wish, we can check the "Start after created" box in the lower left. Alternatively, we can manually start the container whenever we wish subsequent to its creation.
Let's click "Finish" in the lower right hand corner.
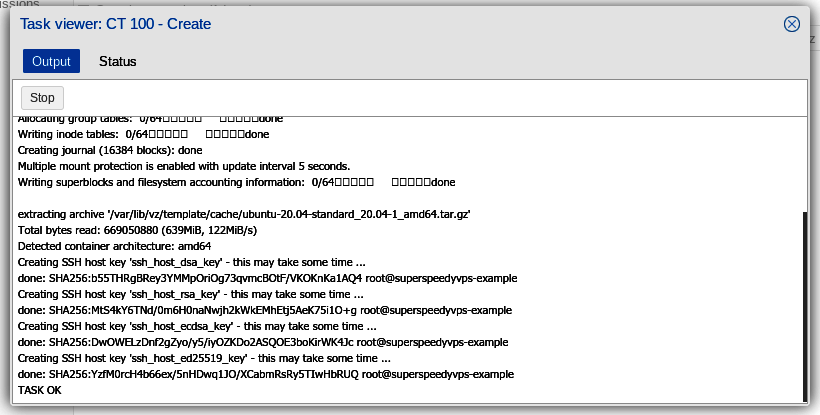
A Task viewer pops up and shows the various tasks related to the creation of our container. Probably we'll have to scroll down to see the final "TASK OK" entry. Our first LXC VPS has been created!
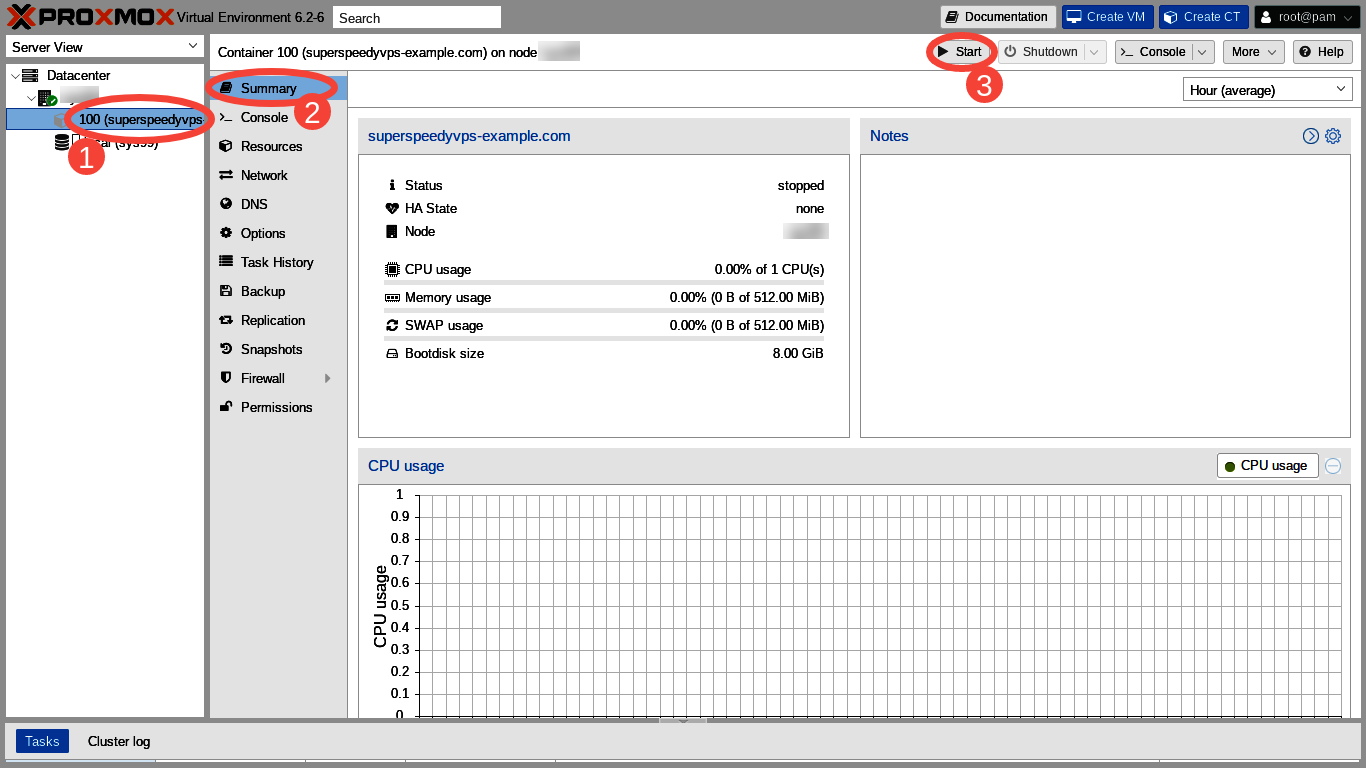
Let's close the Task viewer and then click on (1) Container number 100 (superspeedyvps-example.com) in the far left hand Server View column; (2) the Summary in the left hand column of the main panel, and then (3) "Start" in the right hand corner.
Test
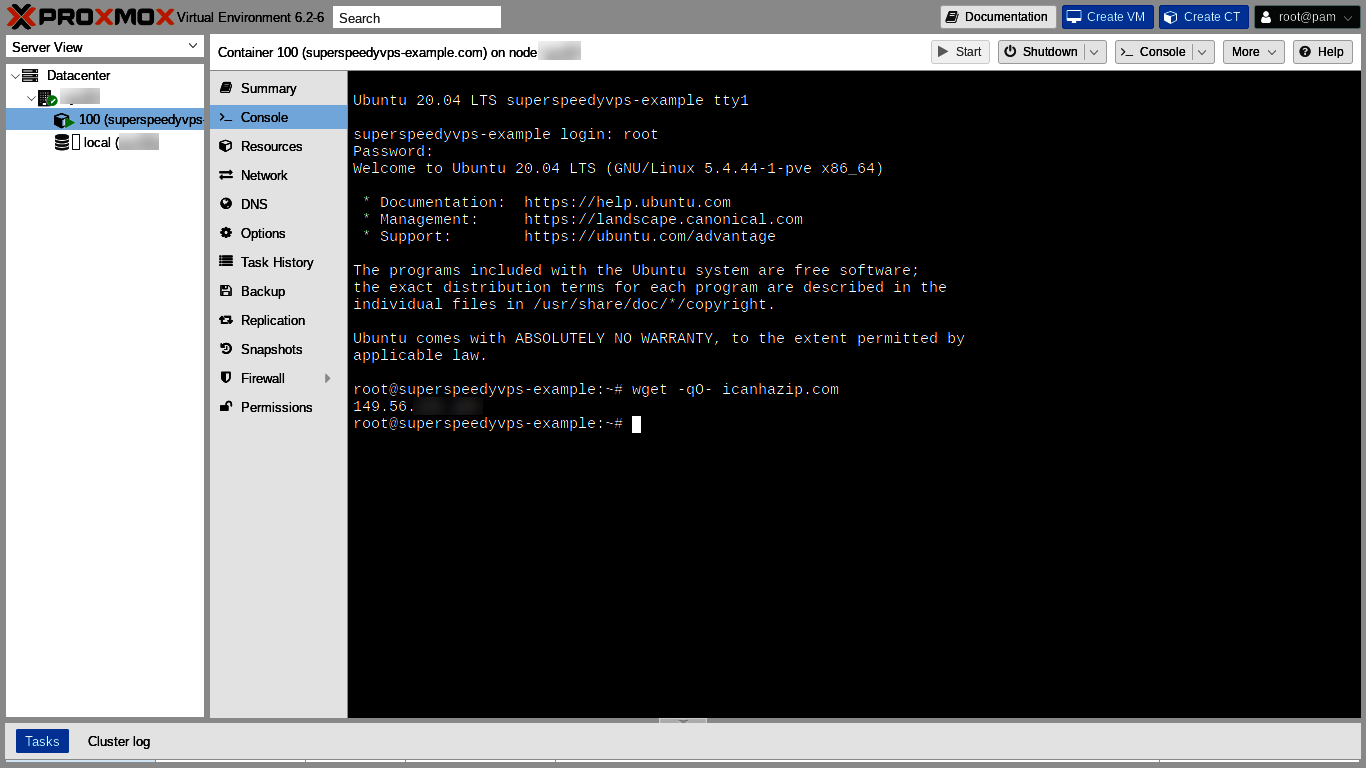
Next, we click "Console" in the left hand column of the main panel. We should get a login prompt. If not, we click inside the console and press the return key. The login prompt should appear. We enter "root" as our username and the password we specified when we created the VPS. The Message of the Day (MOTD) is presented. We can see "Welcome to Ubuntu 20.04 LTS (GNU/Linux 5.4.44-1-pve x86_64)!"
Thanks to Major Hayden we can read the FAQ for his free icanhazip website and then use the site in our first shell command.
Yaaay! Icanhazip.com returns our correct IP!! We now know both that DNS seems to be working and that our IP seems to be configured as expected!!
root@superspeedyvps-example:~# wget -qO- icanhazip.com
149.56.xxx.xxx
root@superspeedyvps-example:~#
Update and Dist-upgrade
It's probably a good idea to update and dist-upgrade our new VPS. Some of the container templates do not seem to be continuously integrated with the upstream so the templates sometimes can need quite a few updates. For example, as of July 2020:
 root@superspeedyvps-example:~# apt-get update
  [ . . . ]
 root@superspeedyvps-example:~# apt-get dist-upgrade
Reading package lists... Done
Building dependency tree... Done
Calculating upgrade... Done
The following NEW packages will be installed:
  libllvm10
The following packages will be upgraded:
  accountsservice apparmor apt apt-utils bind9-dnsutils bind9-host bind9-libs busybox-static
  ca-certificates dbus gir1.2-glib-2.0 libaccountsservice0 libapparmor1 libapt-pkg6.0 libdbus-1-3
  libgirepository-1.0-1 libgl1-mesa-dri libglapi-mesa libglib2.0-0 libglib2.0-data libglx-mesa0 libgnutls30
  libjson-c4 libnetplan0 libnss-systemd libpam-systemd libpython3.8-minimal libpython3.8-stdlib libseccomp2
  libsqlite3-0 libsystemd0 libudev1 login netplan.io openssh-client openssh-server openssh-sftp-server
  passwd postfix python3-distupgrade python3-update-manager python3.8 python3.8-minimal ssh strace systemd
  systemd-sysv systemd-timesyncd tzdata ubuntu-minimal ubuntu-release-upgrader-core ubuntu-standard udev
  update-manager-core
54 upgraded, 1 newly installed, 0 to remove and 0 not upgraded.
Need to get 48.3 MB of archives.
After this operation, 73.9 MB of additional disk space will be used.
Do you want to continue? [Y/n] Y
  [ . . . ]
root@superspeedyvps-example:~#
Firewall
Our first VPS seems to come up unprotected by the firewall because ping works from outside the local network on a new install, but turning on the firewall in the VPS' panel of the Proxmox web GUI without first adding ALLOW rules breaks ping from the WAN.
Note that "Firewall" was checked by default in the Network tab of the Create LXC Container dialog. Note also that the default Proxmox firewall configuration is to drop everything from the WAN and pass only ssh (port 22) and the web GUI (port 8006) coming from the local network.
Here, we created our first VPS with Ubuntu, which is a Debian based distribution. Limited testing here suggests that Debian and Debian based VPSes come up with the VPS firewall set to off despite the default checkmark being set to "on" during VPS creation.
CentOS VPSes, however, seem to come up as should be expected, with the firewall enabled, unless the Firewall checkbox was unchecked during creation. In other words, with CentOS and with the default check of the Firewall checkbox, the VPS seems to come up with the firewall working as expected, with all external WAN network connections dropped.
The VPS firewall configuration in the web GUI is very similar to the host server node configuration. For details, please check the Setting Up the Firewall and Firewall Rules sections of the previous post, part two of this series.
Instead of or in addition to our using the Proxmox firewall, which works outside the container, our customer also seems to be able to run a firewall inside his container.
Conclusion
Hooray! We now have reached our goal of becoming a Low End hosting provider! All that remains is forwarding the container's IP address and root password to the first of our many anxiously waiting clients!


Comments
Do you know why Proxmox 6 is not available in installation templates on SoYouStart?
Hi DavidM! The Proxmox VE 6 template seems to be available but easy to miss. The templates are in alphabetical order. Proxmox VE 6 template name begins with P. The Proxmox VE 5 template names begin with "VPS Proxmox. . . ."
MetalVPS
You're right! Thank you for your help